
- Index
- Homebrew Releases
- Homebrew Projects
- References
- Tutorials
- Useful Source
- Libraries
- About ObeyBrew
- Contact ObeyBrew

|
Search ObeyBrew.Com |
OBEYBREW.COM | Tutorials | A Crash Course In HuC Part 5
A Crash Course In HuC
Part 5 - Animaniacs
A game would look pretty bad without animation. We're going to cover one of the several methods of animating sprites in this tutorial, plus get into some more specifics about some of the functions we've been using so far.What You'll Learn
Sprite animation. That's pretty much it.Getting Prepped
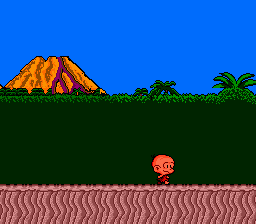
You'll need the sourcecode from the previous tutorial for this one, as well as scene.pcx. We're adding a new sprite though, so we won't need bonk.pcx anymore. Here's the file required for this tutorial. Clicky!Setting Up Our Program
Since we're building off of tutorial 4's code, we're already set up. Now let's get into the new stuff!Monkey With The Code
First things first... let's import our new sprite. It's four frames of animation. Find the following line:#incspr(bonk, "bonk.pcx", 0, 0, 2, 2);
#incspr(bonk, "bonkwalk.pcx", 0, 0, 2, 8);
load_vram(0x5000, bonk, 0x100);
load_vram(0x5000, bonk, 0x400);
Now, we have one more change to make. On our spr_make line, we're setting the VRAM address to 0x5000. If we leave it like that right now, Bonk will appear mid-walk. That looks kinda goofy so change it to 0x5100. Compile and run, and you'll notice an important detail... if you can see the border of the screen, the so-called "overscan region", you'll notice that it's bright pink. Wtf? There's a very good explanation for this... Color index 256, or sprite palette 0 color 0, controls that region's color. We can make it black again in the code by making color 256 equal to zero after loading Bonk's palette. Remember how?
C Bonk, C Bonk Walk
We're going to go with a very basic, but drawn-out, method of animation using a few if lines. Note that although this method is primitive and drawn-out, it is also amazingly fast. The smallest code isn't always the most efficient.First we will need two new char variables. We'll call them tics and frame. Set both to 0. Next, we're going to expand our movement code to allow for animation. This is where things get interesting. Add the following line to the source code in both the JOY_LEFT and JOY_RGHT if blocks:
tics++;
Now, the tic counter is pretty useless if we don't do something with its value, so then here's what we do... we wait until tics reaches a certain value. When it does, we reset it to zero and increment frame. At this point, a new animation frame is shown. When all of the frames have been shown, frame also resets to zero and the cycle starts over again. These are the basics of sprite animation.
Add this code right before the satb_update:
if(tics > 4)
{
	tics = 0; frame++;
}
if(frame > 5) frame = 0;
if(frame == 0) spr_pattern (0x5100)
if(frame == 1) spr_pattern (0x5200)
if(frame == 2) spr_pattern (0x5300)
if(frame == 3) spr_pattern (0x5200)
if(frame == 4) spr_pattern (0x5100)
if(frame == 5) spr_pattern (0x5000)
What Else You Can Do
There's another major way to do this which involves using load_vram and just uploading the frame you need to the VRAM address. This saves VRAM, but it can slow down your program if used too much. It's a tradeoff between speed and memory conservation. Of course, you can utilize both techniques, as many games do.I Need To Take A Break
Okay so this has been pretty cool so far, right? Well, we're going to dive into one more detail in this tutorial which is to cover another input method. Start by creating a new int variable. Call it j2. Then, right after your joy line, add this code:j2 = joytrg(0);
Add the following code after your direction-checking if blocks:
if(j2 & JOY_STRT) pause();
We can add the following function to our source code. Remember that functions are always outside of other functions, never inside of them.
pause()
{
	vsync();
	for(;;)
	{
		if(joytrg(0) & JOY_STRT) return;
		vsync();
	}
}
I wrote the pause function this way to emphasize the importance of the VBL in relation to joytrg. However, if you feel the need to optimize this function, you can actually get rid of the initial vsync call and swap the lines inside the infinite for loop.
pause()
{
	for(;;)
	{
		vsync();
		if(joytrg(0) & JOY_STRT) return;
	}
}
So... I said I'd clear up the meaning of j1 before, now didn't I? Well, here's what... the "j" just means "joypad". So "j1" would just mean "joypad input 1". When we add "j2", it's like saying "joypad input 2". This is not a detail that is set in stone... it's just an easy way of remembering which particular input method we need for a particular segment of our game engine. Call it "fishmonkey90210" if you want, as long as you remember what fishmonkey90210 actually does. :) When I make a game with more than one input, I suffix "j1" and "j2" with the player number. So, I end up with "j1p1" and "j2p1" for player 1, "j1p2" and "j2p2" for player 2, and so on.
So... What's Next?
Hell, this is almost a playable game! Well okay not quite but you know... it's closer than before. So where do we go from here? Well, in the next tutorial, we'll start looking more into background graphics... it's hard to make a real scrolling game without a level to run around in. So we're going to start looking into HuC's map and tile functions. There will be a lot of information to cover... be prepared. :PFull Program Listing
#include "huc.h"

#incspr(bonk,"bonkwalk.pcx",0,0,2,8);
#incpal(bonkpal,"bonkwalk.pcx");

#incchr(scene_chr,"scene.pcx");
#incpal(scene_pal,"scene.pcx");
#incbat(scene_bat,"scene.pcx",0x1000,32,28);

main()
{
	int j1, j2, bonkx;
	char tics, frame;
	bonkx = 104;
	init_satb();
	spr_make(0,104,153,0x5100,FLIP_MAS|SIZE_MAS,NO_FLIP|SZ_32x32,0,1);
	load_palette(16,bonkpal,1);
	set_color(256,0);
	load_vram(0x5000,bonk,0x400);
	satb_update();
	load_background(scene_chr,scene_pal,scene_bat,32,28);
	for(;;)
	{
		vsync();
		j1 = joy(0);
		j2 = joytrg(0);
		if (j1 & JOY_LEFT)
		{
			tics++;
			spr_ctrl(FLIP_X_MASK,FLIP_X);
			if (bonkx > -8) bonkx--;
		}
		if (j1 & JOY_RGHT)
		{
			tics++;
			spr_ctrl(FLIP_X_MASK,NO_FLIP_X);
			if (bonkx < 232) bonkx++;
		}
		if (j2 & JOY_STRT)
		{
			pause();
		}
		spr_x(bonkx);
		if (tics > 4)
		{
			tics = 0;
			frame++;
			if (frame > 5) frame = 0;
			if (frame == 0) spr_pattern(0x5100);
			if (frame == 1) spr_pattern(0x5200);
			if (frame == 2) spr_pattern(0x5300);
			if (frame == 3) spr_pattern(0x5200);
			if (frame == 4) spr_pattern(0x5100);
			if (frame == 5) spr_pattern(0x5000);
		}
		satb_update();
	}
}

spr_make(spriteno,spritex,spritey,spritepattern,ctrl1,ctrl2,sprpal,sprpri)
int spriteno,spritex,spritey,spritepattern,ctrl1,ctrl2,sprpal,sprpri;
{
	spr_set(spriteno);
	spr_x(spritex);
	spr_y(spritey);
	spr_pattern(spritepattern);
	spr_ctrl(ctrl1,ctrl2);
	spr_pal(sprpal);
	spr_pri(sprpri);
}

pause()
{
	for(;;)
	{
		vsync();
		if (joytrg(0) & JOY_STRT) return;
	}
}